Applet: Katie Dektar
Technical assistance: Andrew Adams
Text: Marc Levoy
In the preceeding applet we introduced Gauss's ray
diagram, which allowed us to find for any point in object space the position in
image space where rays leaving that point reconverge (i.e. come to a focus).
One implication of Gauss's diagram is that points on a plane in object space
lying parallel to the lens focus to positions on a plane in image space that is
also parallel to the lens. Thus, we can talk about how distances in object
space (to the left of the lens in the diagram below) relate to distances in
image space (to the right of the lens). This relationship, which depends on
the focal length f of the lens, is given by the Gaussian Lens Formula,
shown in the lower-left corner of the applet below. The standard symbols for
object space distance and image space distance are
so and
si, respectively.
It is beyond the scope of this applet to derive the Gaussian lens formula.
Suffice here to say that it can be derived directly from
Snell's law
of refraction, making only a few assumptions along the way.
The steps in this derivation, the geometrical constructions required, and some
of the algebra can be found in slides 15-23 of this
lecture, or in simplified form in slides 24-26 of the same lecture. A
complete derivation can be found in any undergraduate textbook on optics, such
as Chapter 5 of Hecht's Optics.
Focusing in photography
Drag the image distance slider left and right. Note how the other slider moves
in opposition. Note also how the two red circles in the applet move. Remember
from our earlier discussion that these circles can be treated as the location
of planes parallel to the lens. Think of the right circle as a digital sensor.
As we move the sensor towards the lens, the plane in object space that will be
in focus moves away from the lens, slowly at first, but accelerating as the
sensor approaches the tick mark representing one focal length f from
the lens. If we could bring the sensor right to the tick mark in the applet,
i.e. make image distance = f, then only points in object space
that are infinitely far from the lens would be in focus. If this were a
photographic camera, we would say it is "focused on infinity".
Now drag the object distance slider left and right. For features in object
space at this distance from the lens, the sensor would have to be placed at the
distance computed by the applet in order for these features to be in focus.
Note again the non-linear relationship between the movement of the two red
circles. This non-linearity is caused by the fact that object distance and
image distance sit in the denominators in the Gaussian lens formula. Once
again, if you could bring the object space circle right to the tick mark on the
left side of the lens, then the sensor would need to be infinitely far away to
create a focused view of that circle. It's not practical to build a camera
with a sensor that can move too far from the lens; how far it can move
determines the closest distance on which you can focus. For practical
photographic lenses, this minimum focus distance ranges from a few feet to a
few millimeters.
The relationship between focusing and zooming
Playing with these formulas and applets, it's easy to get confused about what
it means to change the focus on a camera versus zooming a camera. The
difference is important to understand, so let's work through it. Reset the
applet and click on the "Change sensor size" box at the right side of the
applet. A cartoony-looking sensor appears, composed of a column of square
pixels. The edges of this sensor are traced through the lens as light gray
lines. These lines indicate the edges of the field of view (FoV). The formula
for field of view is shown in the lower-left corner of the applet, and the
field of view for your current slider settings is shown in the lower-right
corner. Now move the image distance slider by small amounts. The distance to
the in-focus plane in object space changes, as you would expect, but the field
of view stays constant. This is focusing. Actually, the field of view changes
slightly. This is due to the perspective transform discussed in a
preceeding applet.
Reset the applet again, click once more on the "Change sensor size" box, and
move the focal length slider. Note that the lens gets thicker and thinner as
you do this, reflecting what would be required to actually change the focal
length of a single-lens system like this. The applet has been designed to hold
object distance constant when you change focal length, so instead the image
distance changes to keep the object space circle in focus. Since the location
of the object space circle does not change, we are clearly not refocusing the
camera. However, the field of view changes dramatically, getting narrower as
the focal length increases, as one would expect when moving from a wide-angle
to a telephoto lens. This is zooming. We've also provided a slider for sensor
size. Perhaps you already know that moving to a smaller sensor is equivalent
to moving to a longer focal length; both decrease the field of view. That's
why for APS-C cameras (like the Canon Digital Rebel series), you need to
multiply the focal length engraved on the lens by 1.6 to get the "35mm
equivalent focal length".
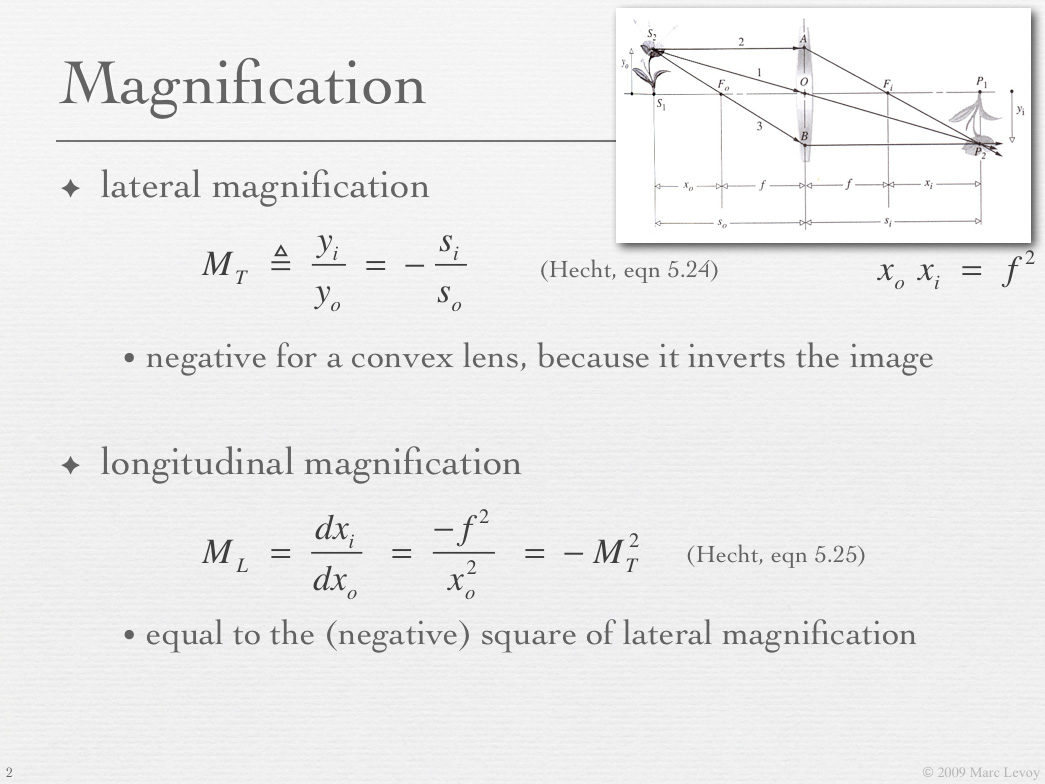
Lateral and longitudinal magnification
As you moved the focal length slider left and right in the previous paragraph,
you might have noticed that the circle in image space gets bigger or smaller,
as well as elongating or squashing. Although these changes may look strange,
they are precisely correct for the situation. If we were to employ the Gaussian ray diagram to compute for each point on the
object space circle the corresponding point in image space (sometimes called
the
conjugate point), the locus of all such points in image space
would form a distorted ellipse.
How should we interpret these changes in the shape of the image space circle?
Think first of the circle's size in the direction parallel to the lens. This
direction is also parallel to the sensor. If the image space circle is smaller
in this direction than the object space circle, it means that big features in
the scene will appear small on the sensor. We call the ratio of these sizes
the lateral magnification produced by the lens for these object and
image distances. For photographic cameras this ratio is typically less than
1.0, and for microscopes it is typically greater than 1.0. For macro lenses, it may be
exactly 1.0 - the situation you see when you press the "Reset" button.
In this configuration we say that the lens is producing 1:1 imaging.
Now examine the size of the image circle in the direction perpendicular to the
lens and sensor. if the image space circle is smaller in this direction than
the object space circle, it means that if a feature in the scene moves axially
(towards or away from the lens) by a given distance, the sensor doesn't need to
move as far to keep that feature in focus. We call the ratio of these sizes
the
longitudinal magnification produced by the lens.
It rises and falls with the lateral magnification, but not in proportion;
otherwise the image space circle wouldn't become elliptical.
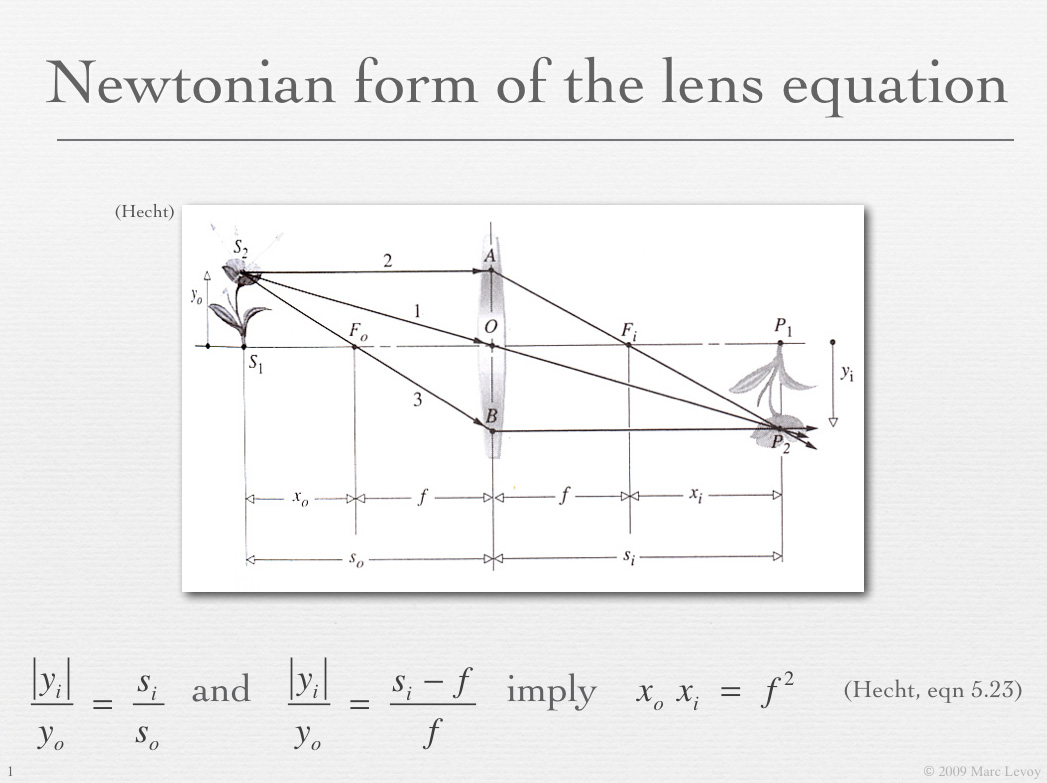
Although it's beyond the scope of this applet, it can be shown that for any
focal length, object distance, and image distance, the longitudinal
magnification is equal to the square of the lateral magnification. Slides 40
and 41 from the
lecture titled "Optics I: lenses and apertures",
reproduced at left, sketch the proof. A complete derivation can be found in
Chapter 5 of Hecht. It is this non-linear relationship between longitudinal
and lateral magnification that gives the image space replica of an object space
cube its characteristic frustum shape in the
preceeding applet.
Relationship to depth of field
Here's one more thing to try. Move the focal length slider to 85mm, and move
the object space slider to 900mm. 85mm is a typical portrait lens, and 900mm
is a typical subject distance for a closeup shot of a human face. (Assuming a
horizontally held full-frame camera having a 24mm x 36mm sensor, the field of
view at this distance and with this lens will be 10 inches tall x 15 inches
wide.) Note that the lateral magnification displayed by the applet is 10%
(meaning 0.1x). This makes sense, because the sensor is 1/10 as high and wide
as the field of view.
Note also that the longitudinal magnification displayed is 10% x 10% = 1%.
This means that for every 1mm you move the lens or sensor, you'll shift the
in-focus plane by 100mm (4 inches) in the scene. That's about the depth of a
human face, and it shows how delicate accurate focusing is! How much of the
face will be "in focus" at once in this situation is another question, which
depends on the diameter of the aperture and the size of a pixel. We consider
this question in the
next applet.